1Panel 部署 ddddocr 验证码识别服务
简介
本教程将指导您如何在 1Panel 面板上使用 Docker 快速部署 ddddocr 服务,搭建一个简单高效的验证码识别 API。ddddocr 是一款轻量级的验证码识别库,识别速度快、准确率高,无需复杂训练。
相关资源
- GitHub - sml2h3/ddddocr: 带带弟弟 通用验证码识别OCR pypi版
- GitHub - sml2h3/ddddocr-fastapi: 使用ddddocr的最简api搭建项目,支持docker
- Docker Hub - oozzbb/ddddocr-fastapi
- 1Panel - 现代化、开源的 Linux 服务器运维管理面板
前提条件
本教程假设您已经安装了 1Panel 面板,如果尚未安装,请先访问 1Panel 官网 进行安装。
部署步骤
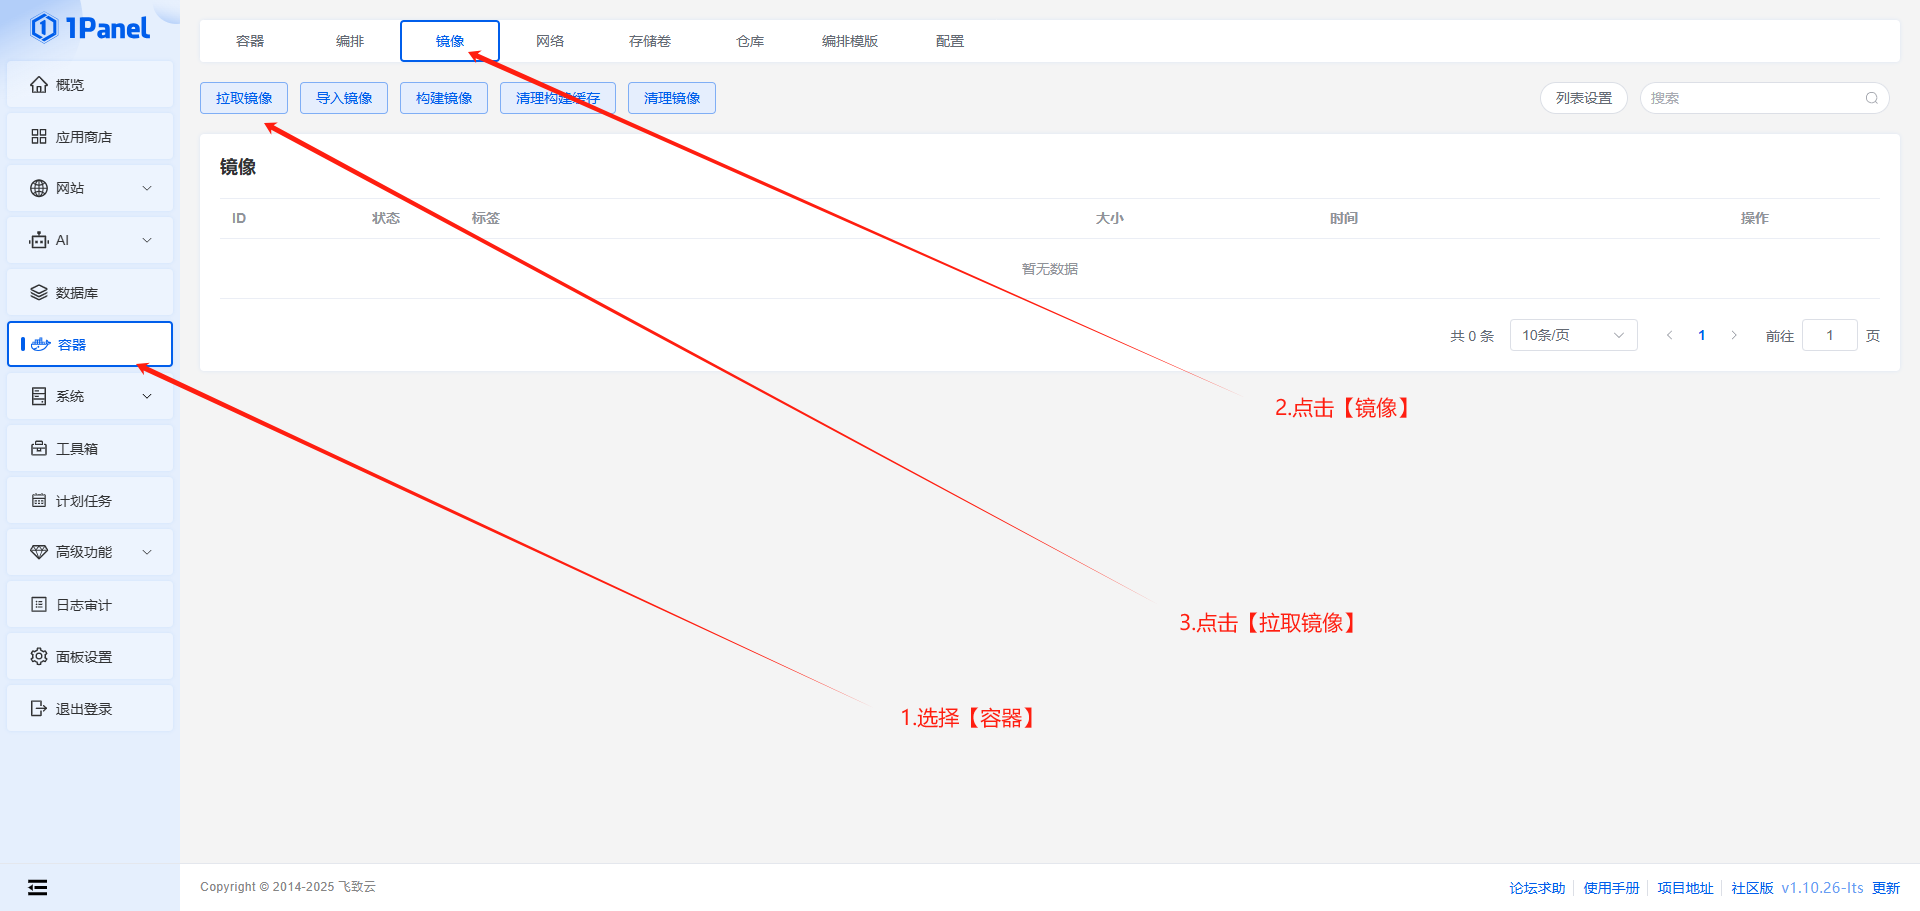
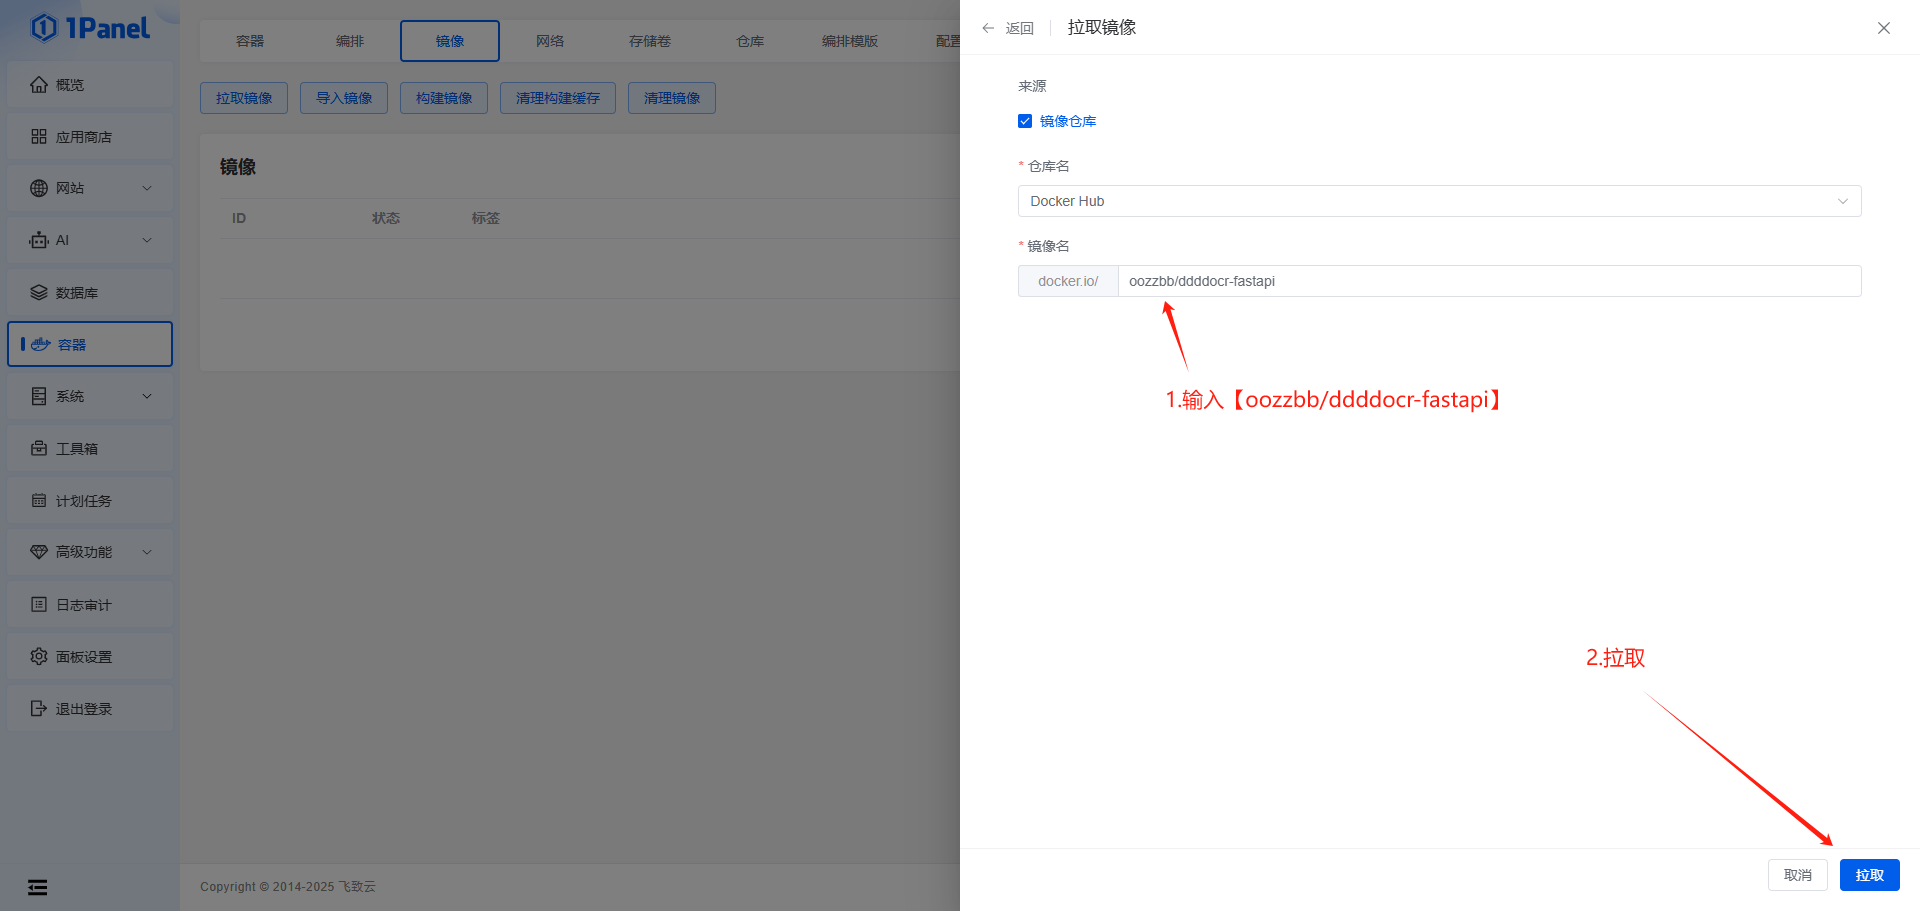
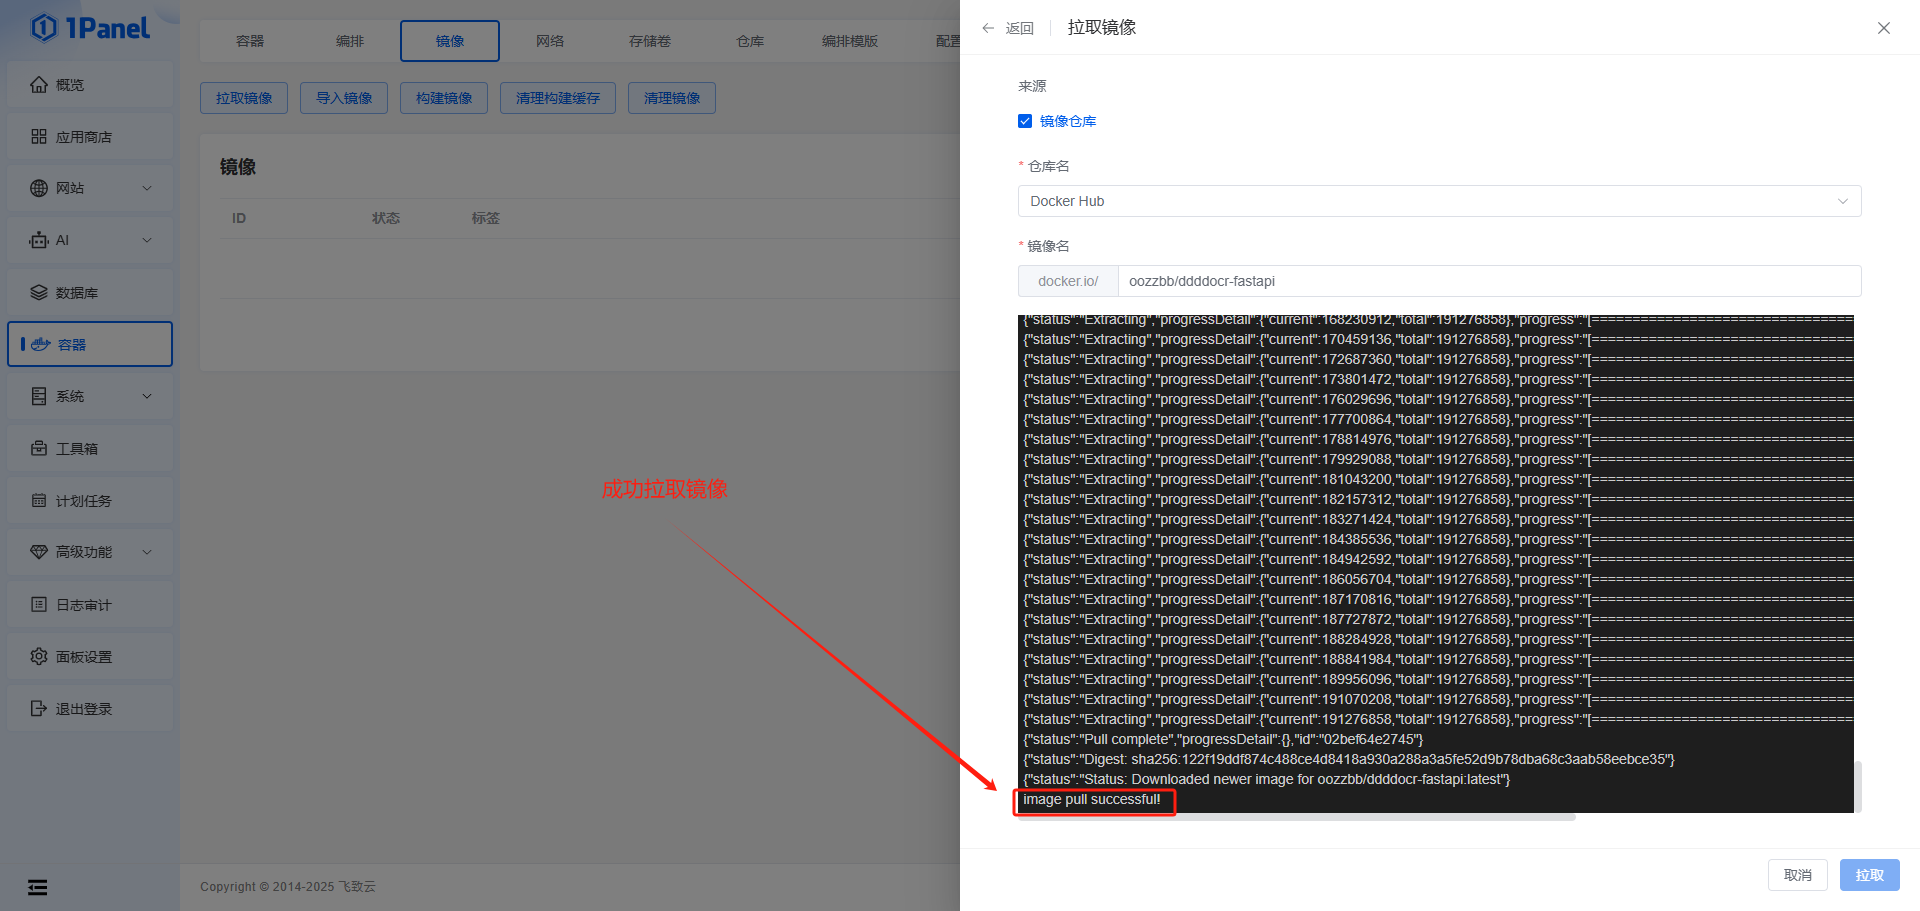
1. 拉取镜像
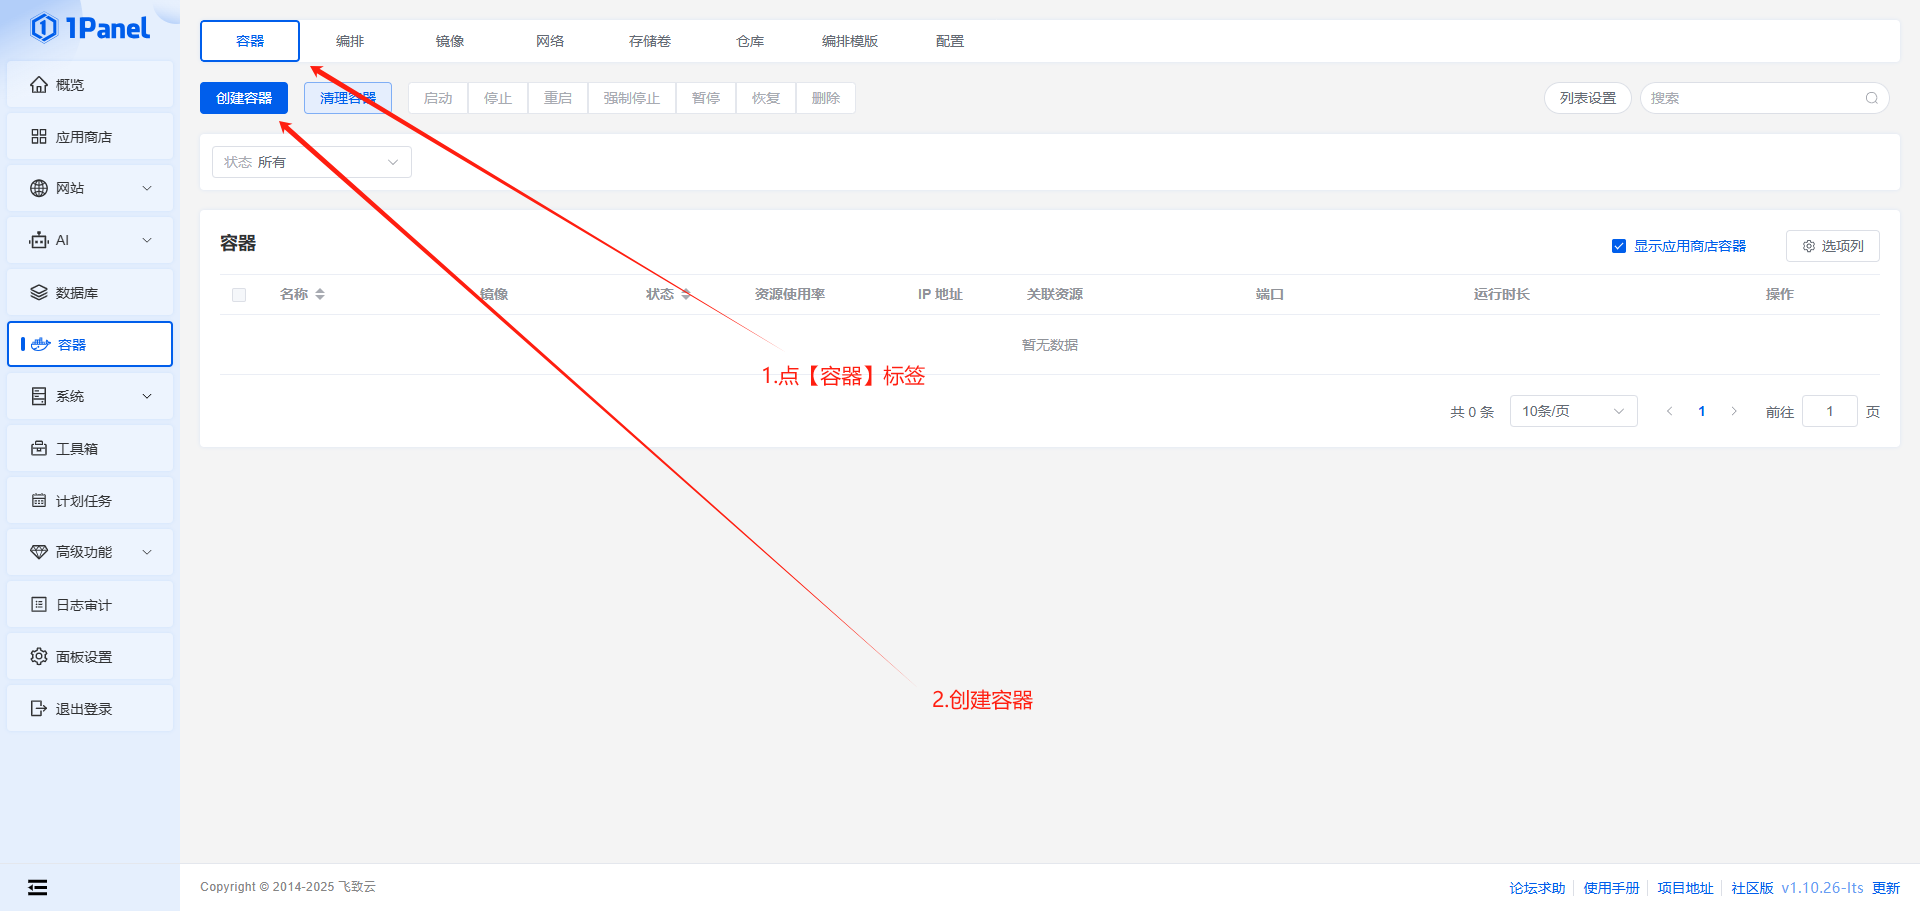
2. 创建容器
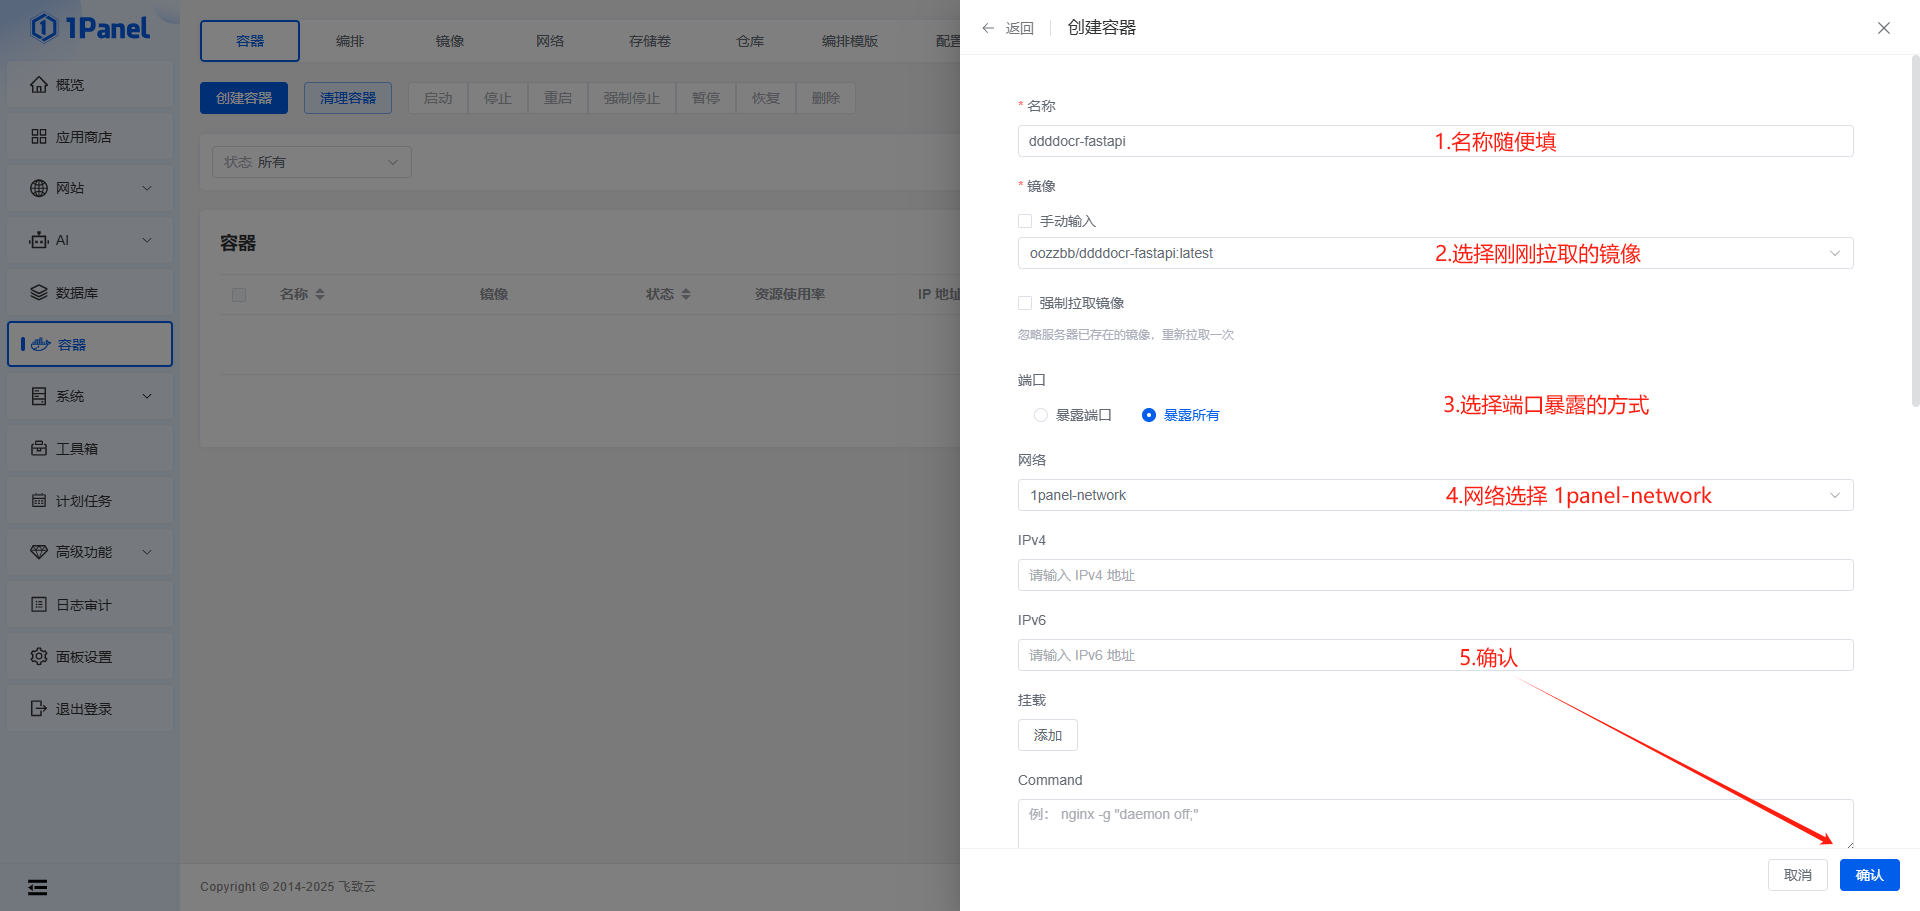
依次点击【容器】—> 【创建容器】
配置容器参数:
- 填写容器名称(如 ddddocr)
- 选择刚才拉取的镜像 oozzbb/ddddocr-fastapi
- 设置端口映射(主机端口可以自定义,如 32768,容器端口为 80)
- 选择网络(通常选择默认的 bridge 网络)
- 点击【确认】创建容器
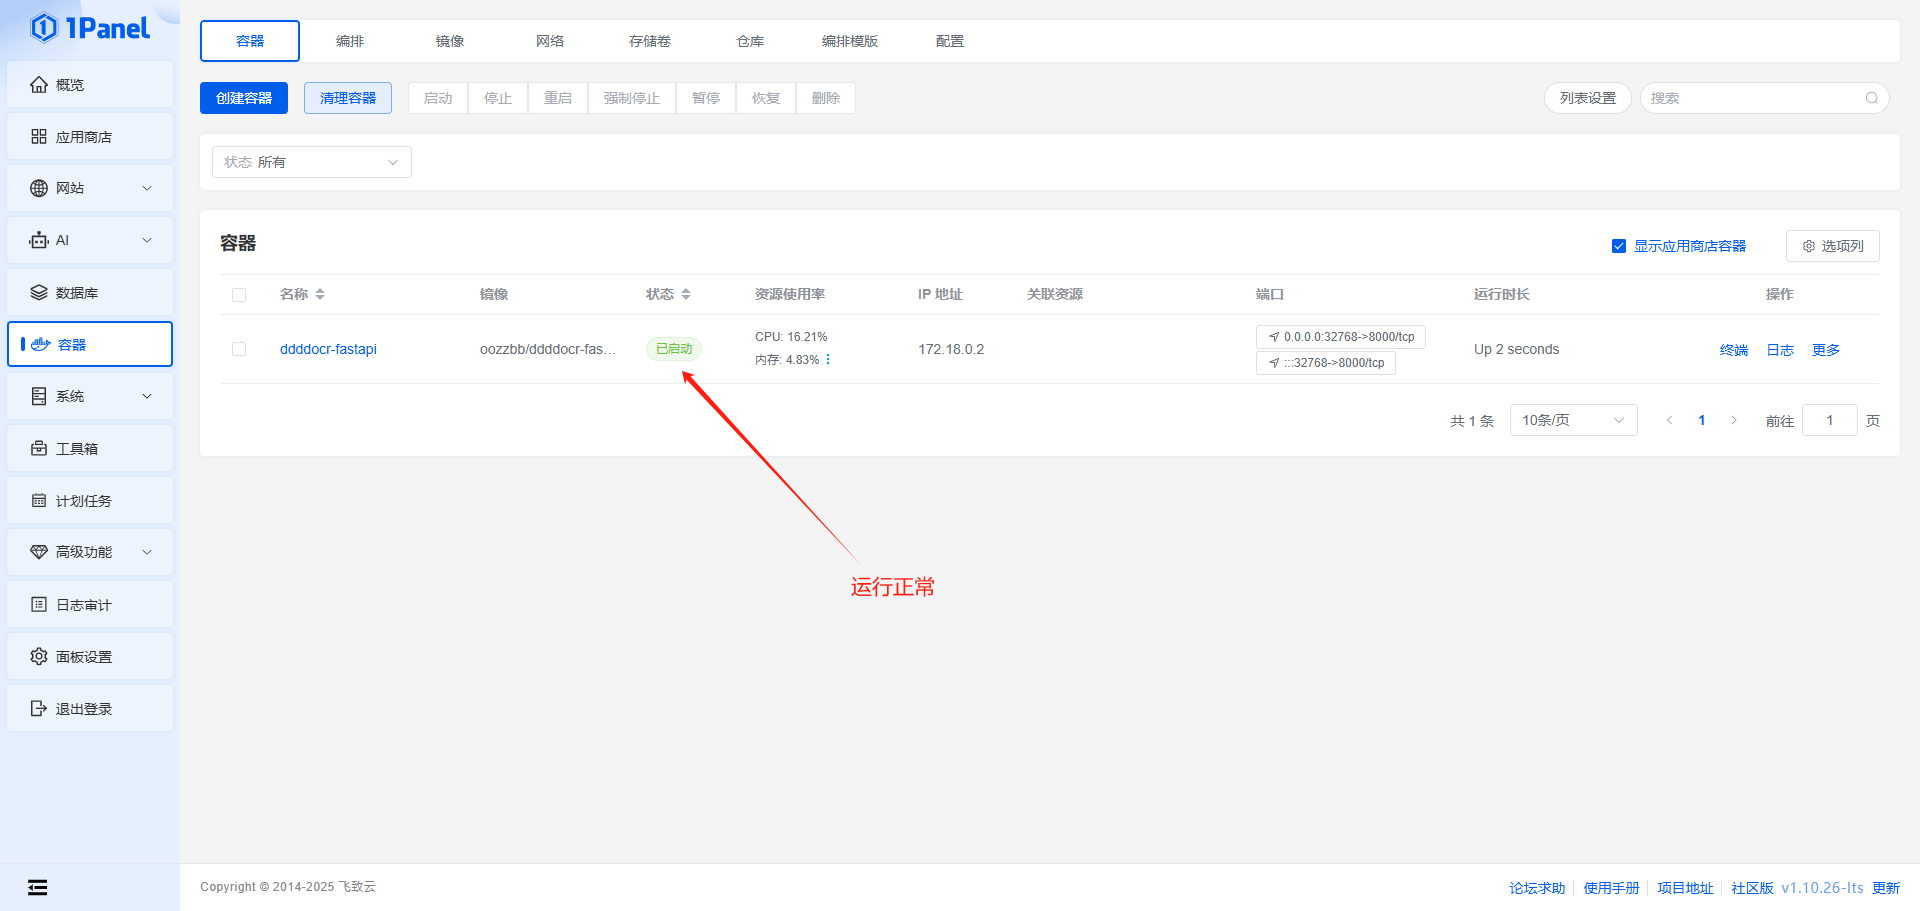
- 创建完成后,容器会自动启动
3. 访问服务
通过浏览器访问
http://您的服务器IP:32768即可使用 OCR 服务注意:请确保服务器防火墙已放行 32768 端口(或您设置的其他端口)
访问
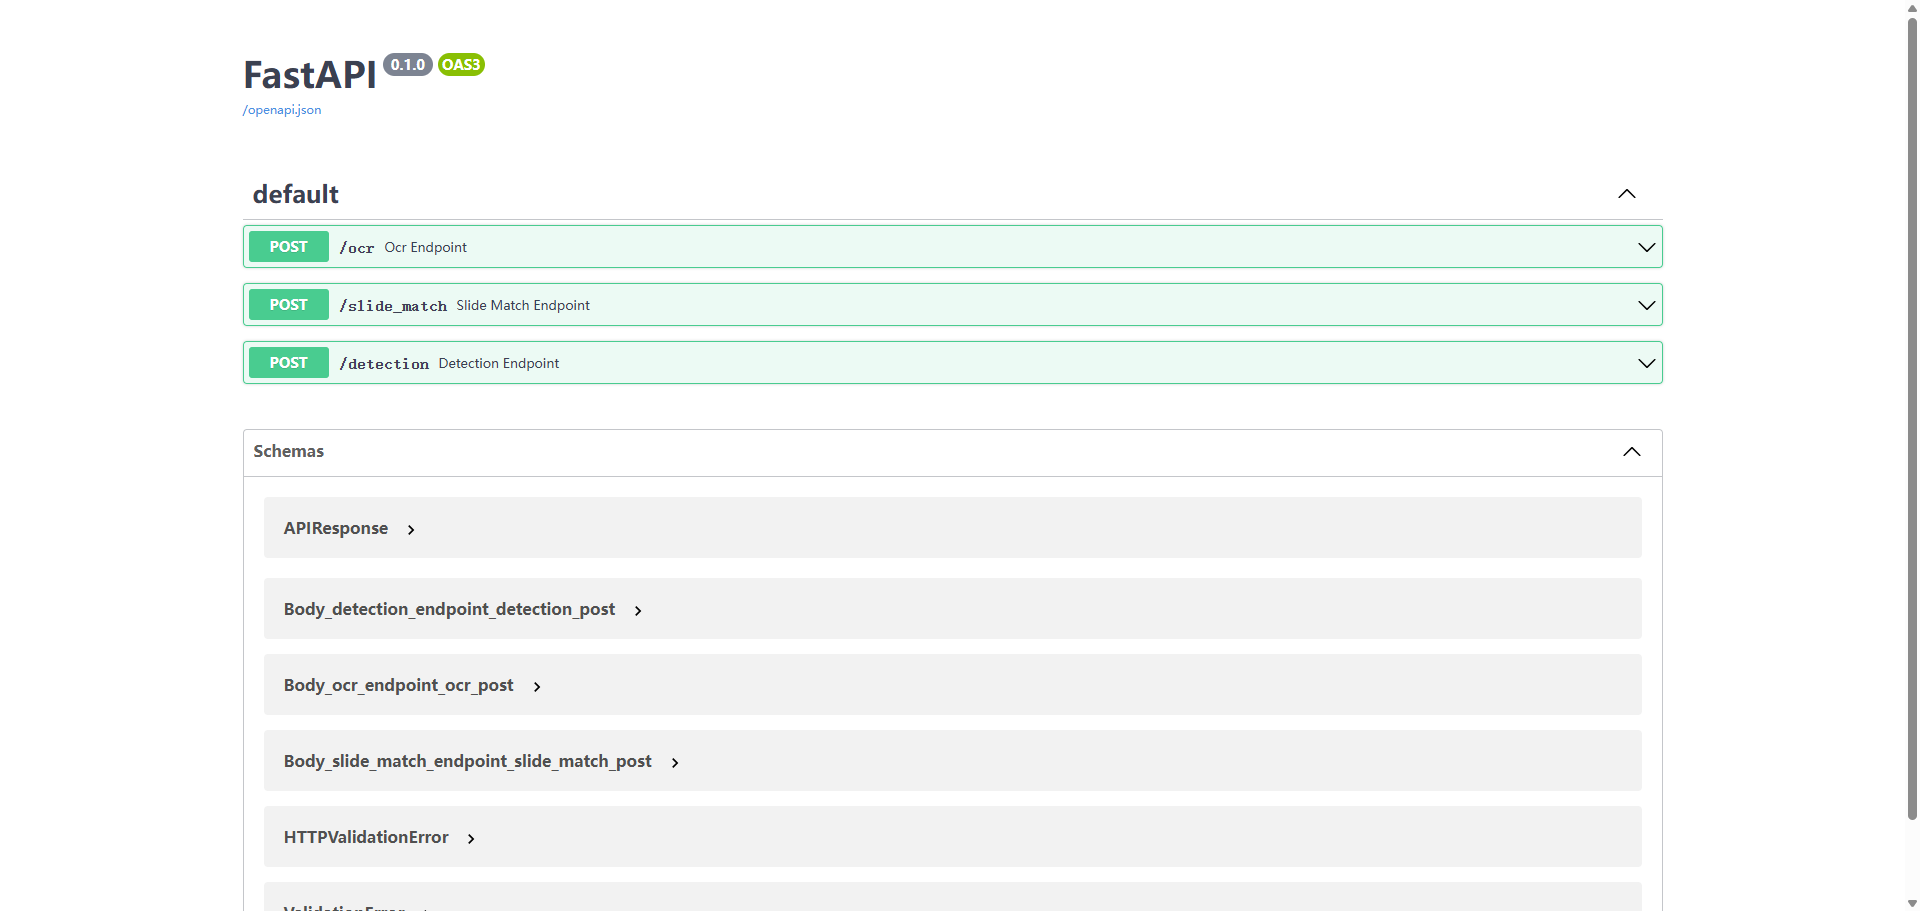
http://您的服务器IP:32768/docs可以查看 API 文档和进行测试
API 详细使用说明
根据部署好的服务文档,ddddocr 提供了多种验证码识别接口,以下是详细说明:
1. 文件上传识别接口
- 接口地址:
/ocr/file - 请求方式:POST
- Content-Type:multipart/form-data
参数:
file:文件对象,验证码图片文件
Python 示例代码
import requests

# 读取验证码图片
with open('captcha.jpg', 'rb') as f:
    files = {'file': ('captcha.jpg', f, 'image/jpeg')}

    # 发送请求到 OCR 服务
    response = requests.post('http://您的服务器IP:32768/ocr/file', files=files)
    result = response.json()

    # 打印识别结果
    print(f"识别结果: {result['result']}")
curl 示例
curl -X 'POST' \
  'http://您的服务器IP:32768/ocr/file' \
  -H 'accept: application/json' \
  -H 'Content-Type: multipart/form-data' \
  -F '[email protected];type=image/jpeg'
2. Base64 编码识别接口
- 接口地址:
/ocr/base64 - 请求方式:POST
- Content-Type:application/json
参数:
image:字符串,Base64 编码的图片数据
Python 示例代码
import requests
import base64

# 读取图片并转为 base64
with open('captcha.jpg', 'rb') as f:
    img_base64 = base64.b64encode(f.read()).decode('utf-8')

# 构建请求数据
data = {
    "image": img_base64
}

# 发送请求
response = requests.post('http://您的服务器IP:32768/ocr/base64', json=data)
result = response.json()

# 打印识别结果
print(f"识别结果: {result['result']}")
curl 示例
curl -X 'POST' \
  'http://您的服务器IP:32768/ocr/base64' \
  -H 'accept: application/json' \
  -H 'Content-Type: application/json' \
  -d '{
    "image": "base64编码的图片数据"
  }'
3. URL 识别接口
- 接口地址:
/ocr/url - 请求方式:POST
- Content-Type:application/json
参数:
url:字符串,验证码图片的URL地址
Python 示例代码
import requests

# 构建请求数据
data = {
    "url": "https://example.com/captcha.jpg"
}

# 发送请求
response = requests.post('http://您的服务器IP:32768/ocr/url', json=data)
result = response.json()

# 打印识别结果
print(f"识别结果: {result['result']}")
curl 示例
curl -X 'POST' \
  'http://您的服务器IP:32768/ocr/url' \
  -H 'accept: application/json' \
  -H 'Content-Type: application/json' \
  -d '{
    "url": "https://example.com/captcha.jpg"
  }'
4. 滑块识别接口
- 接口地址:
/slide_match - 请求方式:POST
- Content-Type:application/json
参数:
target_img_base64:字符串,目标图片的Base64编码bg_img_base64:字符串,背景图片的Base64编码
Python 示例代码
import requests
import base64

# 读取目标图片和背景图片并转为 base64
with open('target.jpg', 'rb') as f:
    target_base64 = base64.b64encode(f.read()).decode('utf-8')

with open('background.jpg', 'rb') as f:
    bg_base64 = base64.b64encode(f.read()).decode('utf-8')

# 构建请求数据
data = {
    "target_img_base64": target_base64,
    "bg_img_base64": bg_base64
}

# 发送请求
response = requests.post('http://您的服务器IP:32768/slide_match', json=data)
result = response.json()

# 打印识别结果
print(f"X坐标: {result['target_x']}")
print(f"Y坐标: {result['target_y']}")
curl 示例
curl -X 'POST' \
  'http://您的服务器IP:32768/slide_match' \
  -H 'accept: application/json' \
  -H 'Content-Type: application/json' \
  -d '{
    "target_img_base64": "目标图片base64编码",
    "bg_img_base64": "背景图片base64编码"
  }'
完整的 Python 调用示例
以下是一个完整的 Python 脚本,展示了如何使用各种接口:
import requests
import base64
import json

# 服务器地址
SERVER_URL = "http://您的服务器IP:32768"

def ocr_from_file(image_path):
    """使用文件上传接口识别验证码"""
    with open(image_path, 'rb') as f:
        files = {'file': (image_path, f, 'image/jpeg')}
        response = requests.post(f"{SERVER_URL}/ocr/file", files=files)
        return response.json()

def ocr_from_base64(image_path):
    """使用base64接口识别验证码"""
    with open(image_path, 'rb') as f:
        img_base64 = base64.b64encode(f.read()).decode('utf-8')

    data = {"image": img_base64}
    response = requests.post(f"{SERVER_URL}/ocr/base64", json=data)
    return response.json()

def ocr_from_url(image_url):
    """使用URL接口识别验证码"""
    data = {"url": image_url}
    response = requests.post(f"{SERVER_URL}/ocr/url", json=data)
    return response.json()

def slide_match(target_path, bg_path):
    """识别滑块验证码"""
    with open(target_path, 'rb') as f:
        target_base64 = base64.b64encode(f.read()).decode('utf-8')

    with open(bg_path, 'rb') as f:
        bg_base64 = base64.b64encode(f.read()).decode('utf-8')

    data = {
        "target_img_base64": target_base64,
        "bg_img_base64": bg_base64
    }

    response = requests.post(f"{SERVER_URL}/slide_match", json=data)
    return response.json()

if __name__ == "__main__":
    # 文件上传识别
    result = ocr_from_file("captcha.jpg")
    print("文件识别结果:", result["result"])

    # Base64识别
    result = ocr_from_base64("captcha.jpg")
    print("Base64识别结果:", result["result"])

    # URL识别
    result = ocr_from_url("https://example.com/captcha.jpg")
    print("URL识别结果:", result["result"])

    # 滑块识别
    result = slide_match("target.jpg", "background.jpg")
    print(f"滑块位置: X={result['target_x']}, Y={result['target_y']}")
完整的 JavaScript/Node.js 调用示例
const axios = require('axios');
const fs = require('fs');
const FormData = require('form-data');

// 服务器地址
const SERVER_URL = "http://您的服务器IP:32768";

// 文件上传识别
async function ocrFromFile(imagePath) {
    const formData = new FormData();
    formData.append('file', fs.createReadStream(imagePath));

    try {
        const response = await axios.post(`${SERVER_URL}/ocr/file`, formData, {
            headers: formData.getHeaders()
        });
        return response.data;
    } catch (error) {
        console.error('识别出错:', error.message);
        return null;
    }
}

// Base64识别
async function ocrFromBase64(imagePath) {
    try {
        const imageBuffer = fs.readFileSync(imagePath);
        const base64Image = imageBuffer.toString('base64');

        const response = await axios.post(`${SERVER_URL}/ocr/base64`, {
            image: base64Image
        });
        return response.data;
    } catch (error) {
        console.error('识别出错:', error.message);
        return null;
    }
}

// URL识别
async function ocrFromUrl(imageUrl) {
    try {
        const response = await axios.post(`${SERVER_URL}/ocr/url`, {
            url: imageUrl
        });
        return response.data;
    } catch (error) {
        console.error('识别出错:', error.message);
        return null;
    }
}

// 滑块识别
async function slideMatch(targetPath, bgPath) {
    try {
        const targetBuffer = fs.readFileSync(targetPath);
        const bgBuffer = fs.readFileSync(bgPath);

        const targetBase64 = targetBuffer.toString('base64');
        const bgBase64 = bgBuffer.toString('base64');

        const response = await axios.post(`${SERVER_URL}/slide_match`, {
            target_img_base64: targetBase64,
            bg_img_base64: bgBase64
        });
        return response.data;
    } catch (error) {
        console.error('识别出错:', error.message);
        return null;
    }
}

// 使用示例
async function main() {
    // 文件上传识别
    const fileResult = await ocrFromFile('captcha.jpg');
    console.log('文件识别结果:', fileResult?.result);

    // Base64识别
    const base64Result = await ocrFromBase64('captcha.jpg');
    console.log('Base64识别结果:', base64Result?.result);

    // URL识别
    const urlResult = await ocrFromUrl('https://example.com/captcha.jpg');
    console.log('URL识别结果:', urlResult?.result);

    // 滑块识别
    const slideResult = await slideMatch('target.jpg', 'background.jpg');
    console.log(`滑块位置: X=${slideResult?.target_x}, Y=${slideResult?.target_y}`);
}

main();
配置域名和 HTTPS(可选)
为了更好地使用 OCR 服务,建议配置域名和 HTTPS:
- 在 1Panel 中点击【网站】→【添加】
- 填写您的域名(如 ocr.yourdomain.com)
- 在网站设置中,选择【反向代理】→【创建】
填写代理信息:
- 名称:ddddocr
- 位置:/
- 代理地址:http://127.0.0.1:32768
- 在【SSL】选项中申请并配置 SSL 证书
故障排除
无法访问服务:
- 检查容器是否正常运行:在 1Panel 的【容器】页面查看状态
- 确认端口是否被防火墙阻止:
firewall-cmd --list-ports - 检查服务器安全组设置
识别结果不准确:
- 检查图片质量和格式
- 尝试预处理图片(如调整对比度、去噪等)
- 对于复杂验证码,可能需要使用更专业的识别服务
服务响应缓慢:
- 检查服务器资源使用情况
- 考虑增加容器资源限制(CPU、内存)
总结
通过以上步骤,您已成功在 1Panel 上使用 Docker 部署了 ddddocr 验证码识别服务。相比手动部署,Docker 方式更加简单快捷,无需关心环境依赖问题。
这个服务提供了多种验证码识别接口,包括文件上传、Base64、URL 和滑块验证码识别,可以满足各种自动化场景的需求。您可以将这些 API 集成到各种自动化脚本和程序中,提高工作效率。
希望本教程对您有所帮助!如有问题,欢迎在评论区留言。
